Wednesday, November 25, 2015

Pet Portrait Commissions


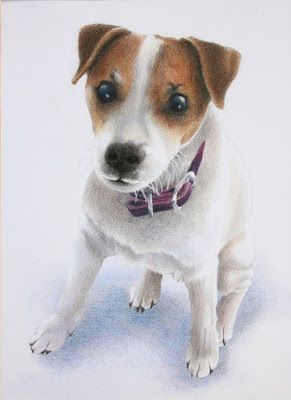
I am posting my three latest pet portrait commissions and the photos I worked from. I take commissions from customers and enjoy working on pet drawings. 

The first (above) is Chester, I was commissioned to draw his portrait in 8x8" colored pencil, varnished and mounted on an Ampersand 3/4" cradled Claybord. I am attaching the photo I worked from because it was not a good reference photo. Fortunately, the customer had other photos of Chester for me to use as reference to get the color of the fur, eyes and details.


Here is Rocco, he is drawn in colored pencil on white Stonehenge paper, 11x14". He was then matted and framed under glass for the customer. I've included the reference photo I used to work from. 


Here is Cyrus, also 8x8" on Stonehenge paper mounted to Ampersand 3/4" cradled Claybord. The first photo is his portrait, the second is a side view in order to see the Cradled Claybord and sealed/varnished drawing. The third is the reference photo that I worked from. 


Monday, November 2, 2015

Small Works Exhibit


I am pleased to be included in this small works show at the Handwright Gallery in New Canaan, Connecticut. The exhibit opens this Thursday, November 5 with an opening reception from 5-8 pm. The exhibit continues through January 2, 2016. Nice group of talented artists!

Tuesday, October 27, 2015

Printmaking Talk at Bristol Art Museum


Please Join Providence Art Club printmakers Sunday, Nov. 1 from 1-3 pm at the Bristol Art Museum for Process and Inspiration talks and demos on contemporary printmaking techniques in conjunction with our Joint Venture printmaking on exhibit at the museum. 
I will be talking about my handmade artist books which are on display. Other speakers will be Susan Patterson demonstrating the white-line woodcut, Richard Harrington, Madolin Maxey and Regina Partridge will discuss different approaches to monotype which is a one-of-a-kind print.
Bristol Art Museum is located at 10 Wardwell St, Bristol, RI and light refreshments will be served.

Wednesday, September 2, 2015

Flower Vase Book Sculpture


I have been inspired to create a vase of flowers cut out of books. I got this idea from a book I bought called Playing with Books: The Art of Upcycling, Deconstructing, and Reimagining the Book by Jason Thompson. I loosely followed his guidelines for cutting the spines off several books and cutting the other edge to form the vase shape. Next I glued the spines with Mod Podge and clamped them to dry. When the glue was dry, I glued the spines of all sections together and when that was dry, I was able to form the flexible circular shape. I held the center together with the interior cardboard from toilet paper rolls and more glue (top photo). 

The next part was the fun part, I learned how to  make origami lilies in several sizes and put together paper roses and leaves. I used several different toned book pages to create different tonality in the piece. 

Thursday, August 20, 2015

Mural Repair Work


I was asked to repair a mural that was painted in a clients' home, the signature at the bottom noted it was painted around 1952 or 1953 and hadn't been touched since then. The paint had begun to chip and flake off in several different areas and the owners were hoping it could be repaired. I've painted a few murals but am not versed in the best way to repair chipped paint so I conferred with a fellow artist, experienced in mural painting and received suggestions on how to proceed. First step was to carefully wash the entire mural surface and there was a layer of a grimy substance especially near the top which had most likely developed over the years.

Next I sanded off the areas that were flaking, which subsequently lead to more flaking paint as I sanded so I needed to be extra careful not to disturb more paint. For sanding, I used very fine sandpaper, 320 grit. Pictured below are the several problem areas.


Once the areas were sanded and clean, I sealed and preserved them with a layer of Liquitex Matte Varnish, to stop any more flaking and preserve the surface to be painted. Once the varnish was dry, my task was to mix the correct colors and touch up the chipped areas. I used several brands of acrylic paints and added Golden Molding Paste added to some of the raised areas to create texture.


This is the finished piece, repainted areas and a coat of Liquitex Matte Varnish applied to the entire mural to seal and protect it for future years.

Tuesday, August 11, 2015

Colored Pencil Talk in Jamestown, RI

Tomorrow evening I will be speaking about the fine art of colored pencil drawing and demonstrating colored pencil techniques in Jamestown, RI. The presentation is free and open to the public, everyone is invited. All information is on the flyer.


Sunday, June 28, 2015

Commission Work


I have been working on this colored pencil drawing of a bouquet of roses for a customer. She sent me photos of the roses and I chose the reference photo (top) which was the best to work from. I added three more roses to fill out the composition and make it more interesting. The middle photo is the drawing in progress. I worked this on Honeysuckle (?) Canson Mi Tientes paper, size of drawing is 7.5x10.5" The Mi Tientes paper is quite textured so I used the harder Faber Castell Polychromos pencils on top of Prismacolor Pencils to burnish or fill in space. 

The bottom is the finished piece, loosely drew the bottom area to blend and abstract the stems and leaves allowing the roses to be the focal points. 

Monday, April 27, 2015

Exhibit at Providence Art Club


 I've been a bit negligent with posting on my blog. I've been working towards an exhibit at the Providence Art Club in Rhode Island with fellow artist and oil painter Jeanne Sturim. Here are photos from the opening reception.

My 2D work is all colored pencil. I have also been upcycling old books into folded and embellished book sculptures, the book sculpture with the origami stars is my newest. I also have created three handmade books, my latest is a star book titled The Meaning of Koi and themed around koi fish and their environment (second to the last photo).


Tuesday, March 24, 2015

Image Transfer with Gesso

 Here is another type of image transfer I have been experimenting with. I begin with a black and white image reversed and printed out on my laser printer, this can be a photo or a line drawing scanned into the computer. I have brushed a generous layer of gesso on top of my 6x6" Ampersand Claybord and I lay my printed image face down on the gesso. I gently roll the back of the image with a (Speedball) breyer to adhere the paper to the gesso, evenly covering all edges and allow the gesso to dry overnight. For more in depth instructions, see Dana Brown's demo on the Ampersand Art website.

When the gesso is dry, I add a little water to the back of the paper and gently rub with my fingers. Layers of the paper will come off leaving the black and white image on the gessoed Claybord surface.  This process takes a while and you must be patient and remove the paper gently as to not remove the image itself. As you see in the photo, I work small parts of the image at a time and brush off the paper flakes with a soft brush.

 Here is my image with some texture from the gesso, it creates a unique surface in which to add color with colored pencils or watercolor pencils. The gesso alone is a bit slick and won't take colored pencil but the image itself will hold the waxy pencil.

These are my nine 6x6" cradled Claybord panels that will hang together as a series. The seaweed, the nautilus shell and the sea urchin are gesso transfers and the other six are image transfers with CitraSolv as explained in my last blog entry.

I like both of these methods as a quick alternative to detailed line drawings as a base for color. I will varnish these pieces and they will hang just as they are shown here.

Sunday, March 22, 2015

Image Transfer with CitraSolv

 I'm working on a series of nine 6x6" ocean themed images to be hung together in a series. For the supports I am using Ampersand Claybord blocks (3/4" cradled). Instead of a drawing on each 6x6" piece, I am using image transfer with CitraSolv and a second image transfer process with gesso.
For this blog entry, I will talk about the CitraSolv image transfer. To begin, I cut a piece of white drawing paper to 6 1/2 " square to allow for extra on the edges, here I used Strathmore 300 series Bristol paper, vellum finish. I also like to use Stonehenge drawing paper by Legion Paper Company.

I take the computer black and white image which I resize to 6 1/4" square and reverse it in Photoshop and print it out on my laser jet printer (won't work with inkjet). This piece is a photograph from a scuba diving trip I took. The photo had a intricate background that I didn't want so I hand cut around the image with scissors. Next I lay my reversed image on my square of paper and tape it on one side so it won't slip. I put a little Citrasolv in a container and brush it onto my reversed image to transfer the ink onto the Bristol paper. Careful not to get the brush too wet so it creates a puddle on the paper. I lightly burnish the image with a bone folder (the off-white tool on the right of the picture) to transfer the ink evenly.

 Here is the reversed image on the paper carefully transferred with the CitraSolv.

 When I take off the laser copy, here is my image transferred onto the Bristol paper and I can work directly on top with colored pencil. I want to warn anyone who tries this method: the CitraSolv does have a strong odor and it takes about an hour or more after the image is transferred to go away. Also, depending on how much CitraSolv is used, it could leave some wet spots on the paper so I will wait an hour or more to begin laying colored pencil on top.

Here is my finished drawing, hand colored with colored pencils. A quick way to skip the drawing process under the colored pencil! Plus you have somewhat of a value study underneath to help with values.

Saturday, March 21, 2015

Hide and Seek


I meant to take photos of this piece in progress but just kept working and now it's finished. I titled this drawing Hide and Seek because I felt stones were taking on a  life of their own by hiding behind others as I worked. I started by working from the left to right, stone by stone, shell by shell. I started by putting on the dark lines and markings of each stone's individual characteristics and letting one flow into the next. One big challenge was getting the shadows just right, in my photo they appeared much darker and overpowering (photos can do that). I used some Indigo, Black Grape, Dark Umber and Warm Gray 90%.

Creating the sand is also a challenge. Here are my scribbles on the side of the paper, these are all of the (Prismacolor) colors I used to make the sand and probably a few I didn't name.


I am also happy to announce that my piece Winter Glow received an honorable mention in CPSA's ArtSpectations Spring 2015 on line exhibit. Take a look at the link, there are some really nice colored pencil works for inspiration.


Thursday, February 19, 2015

Newport Art Museum Class in Colored Pencil

Just a quick note to say my colored pencil drawing class starting Friday, February 20 9:30 am -12:30 pm (tomorrow) will be running. There are only three students signed up and space for more if any local prospective students are reading this! Here is a link to Newport Art Museum Coleman Center for more information.

The class runs for 5 weeks, Feb 20 - March 20: Fridays from 9:30 am to 12:30 pm.
Cost is $140/members and $165/non members.

Sunday, February 8, 2015

New Colored Pencil Work

On my drawing table, or rather on the kitchen table. I have been working on this new drawing of rocks and shells on the beach while spending time in Florida away from the cold. The piece is 14x18" on Stonehenge drawing paper. I started by laying in the sand and the shadows beneath the rocks. Sand is more difficult than I thought, I've layered many colors in an attempt to capture the colors and textures of the sand. I'm keeping the layers light because when I put colors and values on the rocks, I know I will have to adjust the values of the sand and shadows.


I am working rock by rock! It takes time and patience. I'm drawing in the marks on the rocks and then surface colors and textures. I keep adjusting sand, shadow and rocks themselves as I go along.

Sunday, January 11, 2015

Pet Portrait of Arnold


This is a pet portrait I just finished for a customer of a beloved dog, Arnold. This portrait is 8x10" and I worked on UArt 800 grit paper. I started out using Faber Castell Polychromos pencils because they aren't waxy and can be burnished/blended into the surface of the paper with a brush. The UArt paper is very textured so I like using the Polychromos pencils especially for the first layer because they become powdery and will blend right into the surface for me. After I have a good layer of color on the surface, I will continue using the Polychromos and Prismacolor pencils to layer color on the piece and render the fur and features. To finish, I sprayed a fixative over the piece and framed it under glass.