Showing posts with label drawing. Show all posts

Friday, March 21, 2025

Working in Ceramics

I am taking classes in ceramics at Lighthouse Art Center while spending the winter in Florida. I am working mostly with handbuilding and underglazes which utilizes surface design. I really enjoy exploring another medium, especially creating images on 3D surfaces instead of using flat papers. I feel this stimulates my creative growth. 

The top pieces are created from slabs and the technique I used is image transfer where I paint the design on newsprint with slip and underglazes and print it onto the wet clay before it is fired. 

This technique is again working with underglazes but using stencils cut from newsprint, dampened and applied to the wet clay. I layer my underglazes and stencils to produce the shapes. I did learn that I need to use like colors, the blue over the orange neutralized because (orange and blue are complementary colors) creating some grays instead of the nice light blue I was trying for. 


This piece is also hand built but a small pinch pot. I first painted it in the Bermuda Green slip and let it dry. Then I carved into the wet clay to create the designs and then hand painted them with underglazes. 


These small cups are built from slabs and formed into cups, I added hand built handles. The green has Bermuda Green slip applied and the orange cup has Orange slip applied. I then hand painted the designs with the colored underglazes. 


I created this little dog who later lost his collar unfortunately because the clay was too brittle. He isn’t finished yet, I am looking for a special glaze for him. Here he poses with the studio cat Cheeto.
 

Sunday, November 3, 2024

Working with Acrylic Inks & Gouache


I have a beautiful handmade sketchbook that was given to me and recently decided to start putting artwork on the pages. I have been a follower of Dina Brodsky on Instagram and like her method of creating small paintings or sketches using gouache over acrylic inks. Dina's work is amazing and she teaches workshops and classes on sketching and painting birds. 

I decided to try experimenting on my own. To begin, I created a small drawing in pencil then went over it with black ball point pen. 


I have plastic wrap taped under this page in order not to get the acrylic ink on subsequent pages. I wet my page with water on a brush, then randomly add drops of acrylic ink. I am using Ultramarine Art Spectrum Liquid Ink  because I had it in my studio. I push the random drops around with a paint brush and then spritz the ink with a spray bottle of water to create the starbursts and patterns. Its really fun just to play and see what kind of outcome I get. 


Using my Winsor Newton brand gouache, I paint the bird and berries using small brushes. Dark to light, applying dark colors first then adding lighter colors on top. 

For the Bluejay painting I drew him in black ball point pen and added some journaling in the background, writing about Bluejays and their characteristics. 


This photo shows more of how I have put plastic wrap under the page, secured it with clips and tape so the ink doesn't get on everything (which it did anyway). The clips help keep the pages from curling but I have to move them around so I get an even distribution of inks. For this piece I am using a mixture of Golden High Flow Acrylics in Green Gold and Golden Permanent Violet Dark. I wet the paper with a brush and water and then randomly add drops of the two colors. I move the colors around on the page with a wet brush and then added table salt for the texture. 


Next I paint the bird and branches in gouache. I really like the purples coming through behind the Bluejay.  I'm not really sure I need the writing behind, I think the texture of the colors and salt is interesting enough.


For this painting I drew the Cardinal and branch in black ball point pen and again added some journaling about Cardinals. I then used Burnt Umber and Prussian Blue Liquitex Acrylic Ink for the background. Misted with water before painting the Cardinal and branch with gouache. If you would like to see a more detailed video of this process, I found Marianne Vander Dussen's video Gouache Sketchbook on YouTube. She explains this process more in depth.

Tuesday, July 26, 2022

Safari Drawing in Colored Pencil

I used a variety of reference photos from my safari trip to create this scene for customers who were looking for a custom wedding gift for their son and his wife. The newlyweds are very fond of cats so the lioness and her cubs were fitting as the main subjects. We decided on the other supporting animals and landscape for the middle and background. I used warm colors for this piece to depict the beautiful light of the Africa afternoon. My reference photos were taken from Kenya and Tanzania.

This drawing is 18x24" in colored pencils and drawn on cream Canson Mi-Teintes paper. I used a variety Prismacolor, Caran d'Ache Luminance and Faber Castell Polychromos pencils for this drawing. I choose different pencils because I want to use both lightfast pencils and certain colors to create my work. 

I sweated this one out because I hadn't worked on a piece so large in quite a long time and also because I had the concept in my head but could I put it on paper? My biggest struggle was what to do with the midground beween the animals to make it interesting yet still add some 'quiet' areas for the eye to rest between subjects. My second biggest struggle was depicting all those blades of grass in the foreground!! All in all I am happy with the result. 

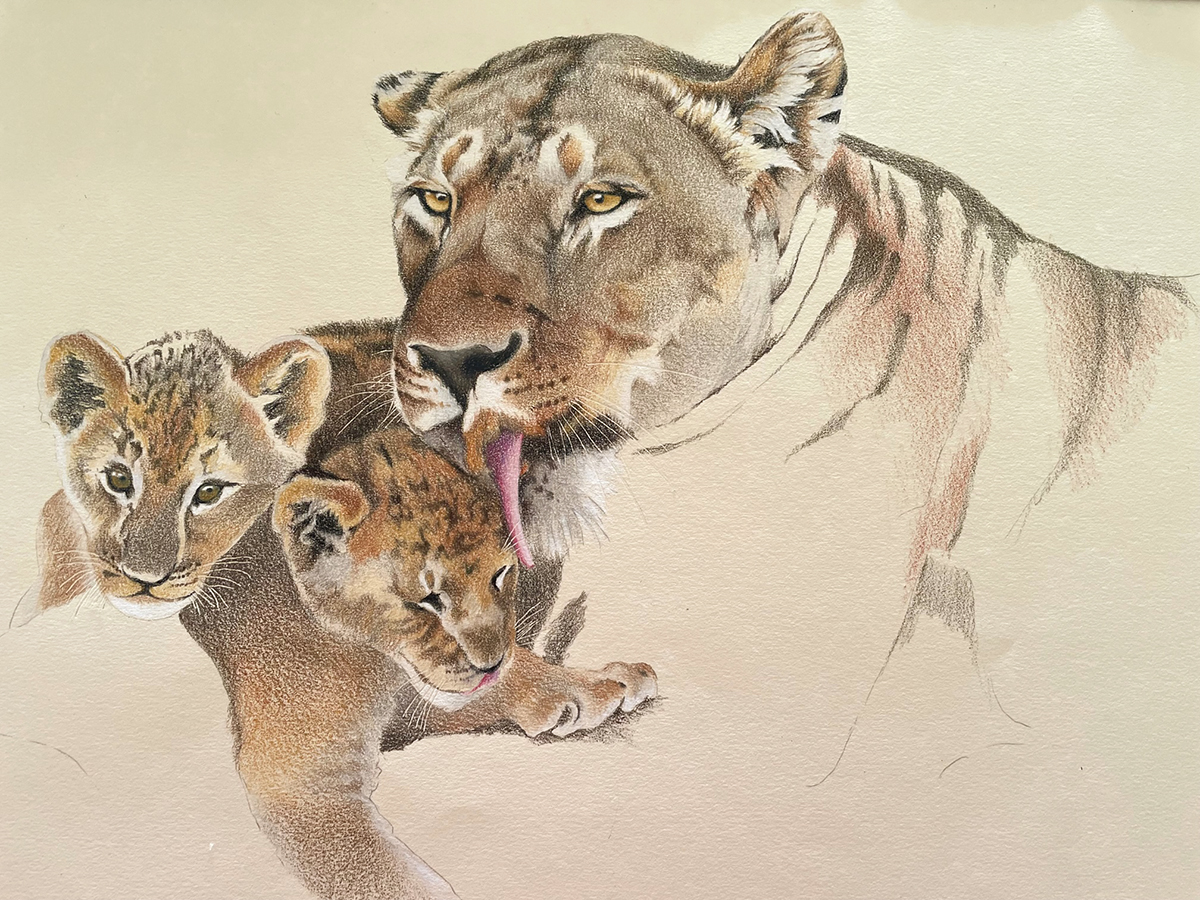
Below is my beginning of the lioness and cubs. I may recreate them again just by themselves.


Tuesday, March 1, 2022

Upcoming Colored Pencil Classes!

Upcoming Colored Pencil Workshop and Class with Kendra:

Mystic Museum of Art
Mystic, Connecticut
One-Day Colored Pencil Workshop


Colored pencil is a versatile medium that is portable, inexpensive, and great for combining with other types of media such as watercolor. Through layering and mixing translucent colors directly on the drawing surface, a luminous image is produced. Students will be shown different techniques and approaches to create a vibrant drawing while drawing from a still life. Students may then implement these techniques to continue on their own personal project.

*Limited to 12 students.

Saturday, March 26th 9am-3pm

Members $115 / Non-Member $130

Register on Line at MMoA


Bristol Art Museum 
Bristol, Rhode Island
Colored Pencil Drawing with Kendra Ferreira

April 19th, 26th, May 3rd,10th | 9:30am-12:00pm
Fee: Members $125/ Non-Members $135

Discover the vibrancy of colored pencil in this 4-week class. We will be learning the many versatile ways of drawing with colored pencils. Topics will include: layering, blending and burnishing techniques as well as working with value and form. Each week we will work on a different project and small still life set up. Some colored pencil experience is helpful but beginners are also welcome.

To register or for more information, please contact Kendra kjfdesign13@gmail.com

Sunday, February 20, 2022


I am exhibiting these colored pencil drawings (above) at the Narrows Center for the Arts in Fall River, Massachusetts with our group Nineteen on Paper. The exhibit is on through March 12th. 
 

Friday, November 19, 2021

Pet Portrait of a Little Yorkie

I’ve been working on this pet portrait of this little Yorkshire Terrier, Barrington. I am using primarily Prismacolor colored pencils and working on Canson Mi-Teintes paper, the color is called Hemp. I use the Mi-Teintes paper on the smoother side, not the textured side which works better when using pastels. 

I always start with the eyes because they’re the most important feature then work to the nose and mouth. Once I have the sparkle in the eyes and the facial features correct, I can start working the rest of the head and body.

Working on the body and all the little strands of fur. I start by adding my white highlights first so I don’t cover over them and then go to the darkest color and place it in the darkest areas of fur. Putting in those values helps me to define the lightest areas and darkest areas of his fur. From there I worked on the gray tones then added the tans and brown. I work one section at a time and then move onto the next section of the fur. For instance, one ear or one leg at a time. 


Barrington’s favorite spot is to sit in the laundry basket so that is how his owners wanted me to draw him. I’m working on the background, adding in the different bits of laundry but have to be careful that all the patterns and textures will detract from the dog. When I finish the background I will go back and make adjustments to the fur, especially around the edges. I may need to intensify some colors to bring him forward, and gray some background colors to make background elements sit back.

These are my color notes on the back of the paper. Colors always look different on a colored background than they do on a white background. It helps me to label the ones I plan to use on the fur, some of the browns and tans are so close in value and color that it’s hard to determine which is which just by picking up the pencil.


Monday, November 15, 2021

Featured on the Sharpened Artist Podcast


 John Middick host of the Sharpened Artist recently asked me to be a guest on his Podcast to talk about my start as an artist, how I got to where I am and talk about my work in colored pencil. I was nervous leading up to my interview but really enjoyed talking with John and discussing my work. 

The podcast is just over an hour, it is Episode #327 - here's the link - hope you enjoy if you decide to listen! By the way, John has 328+ additional podcasts you might want to check out. He talks about lots of subjects such as materials or artist resources and hosts many other artist interviews.  

Monday, August 23, 2021

Cape Cod Art Center Workshop


I taught a 2-day colored pencil workshop at Cape Cod Center for the Arts in Barnstable, Massachusetts. After an introduction to working with colored pencils: materials and techniques, students worked on small still life drawings to get used to the medium. One the second day we worked the sunflower drawing with colored pencil on UArt 800 sanded paper. I wanted students to become familiar with colored pencil drawing on sanded paper and how it differs from non-sanded (traditional) papers.

Small class and still paying attention to Covid social distancing but it was really fun to be able to work together in person!


Saturday, April 10, 2021

Image Transfer on Pottery

Creating image transfer in just black and white, experimenting with pattern.


Here is one of the forms I use to press into the clay to create the dish/tray form. 

Lemon drawing just after being transferred. I still need to clean up edges.

Image has just been transferred on the clay. This is going to be a little octopus dish after I press it into the form. 

Here I am working on a clay form, this is a container I handbuilt from coils and added image transfers of the nautilis shells on the three sides. 

On this platter I decided to get more illustrative with the sea coral and shells. 


Wednesday, March 24, 2021

Image Transfer Drawing on Clay

We've been lucky to have been able to spend the winter in Jupiter, Florida and I have been taking Image Transfer on Clay & Handbuilding Ceramics classes at the Lighthouse Art Center in Tequesta, Florida. I chose to try a new medium which is working with clay and really am enjoying another method of drawing and transferring the drawings onto clay. The drawing is done on newsprint with needle tipped bottles of underglaze and then colors are painted on with colored slip (liquefied suspension of clay particles in water). I have been using white slip as the background.

The slightly wet drawing is then transferred (rubbed) onto slightly wet clay. I am using a red Hawaiian clay because I like the contrast of the dark clay against the light colored and white slip on the drawings. I then press the clay into a form to create the dish or tray and clean up the edges. 

I always think it's such a great learning experience to experiment with new mediums and techniques.

Drawing on paper with the underglaze.


Finished turtle dish

Transferring the (underglaze and colored slip) drawing from the newsprint onto the clay

Finished lobster dish after being kiln fired. Colors aren't perfect, the white slip is varied in thickness which makes it more interesting.

New dish in progress and before kiln firing. Cleaning up edges next.

Little fish dish, the only piece that has come out perfectly formed and painted! Wow!
But I'm still learning.

Little octopus dish in the making

Pot  and saucer I made for my orchid with a ginko leaf design.

Round fish dish with a crack! But still fun to display or use.

Monday, September 28, 2020

I am a Contributing Author of this New Book!


I was very excited when asked by GMC Publications to be included in the newly published Painting & Drawing Techniques and Tutorials for the Complete Beginner book. Some of my tutorials and lessons from my previous colored pencil book have been included with the works of five additional artist authors Paul Clark, Adrian Burrows, Noman Long and Richard Rochester. 

This book includes some really good information with beautiful illustrations and easy to follow steps about how to draw in charcoal and pencil, and how to paint in watercolor, acrylic and oil painting. It is a great resource for artists who wish to learn about these different mediums from supplies to lessons and it's all included in one book. 

This book is available through Amazon.com at this link.